Note: Long post, but molte immagini…
Creating a basic ticketing system in [SharePoint Online] is easy. But to include the email attachments, a few additional steps are needed. Luckily, Microsoft Teams and Power Automate will handle the heavy lifting again. Despite that, here are some semi-vague instructions:
- Create a team in Microsoft Teams
- e.g., Support Group
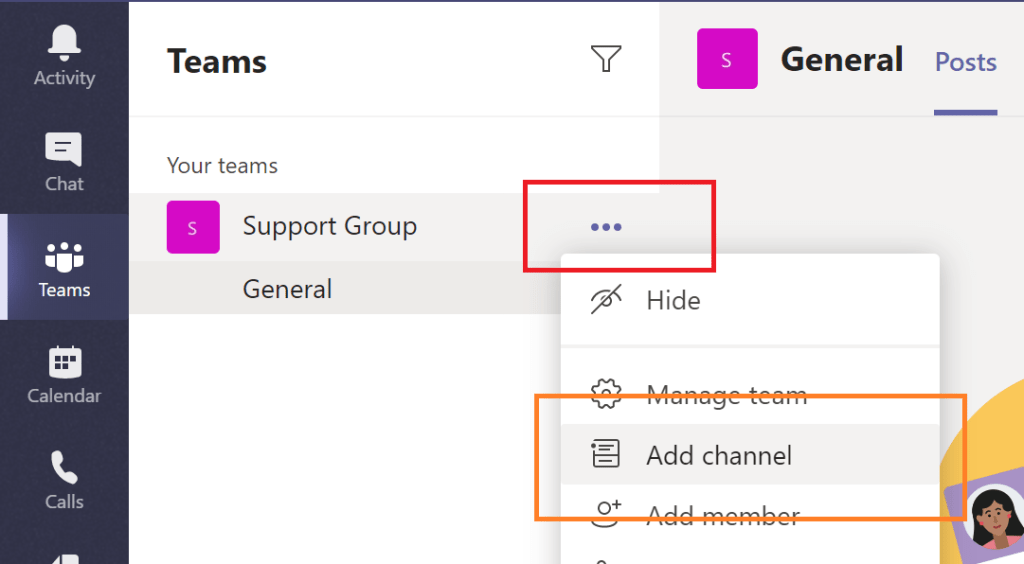
- Create a Tickets channel
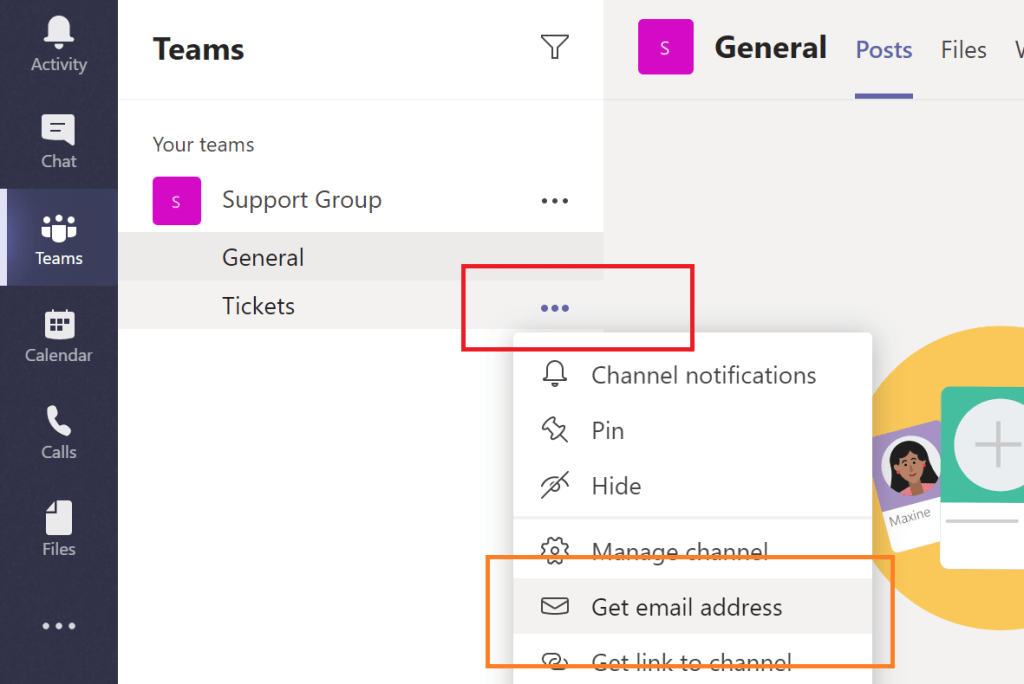
- Copy the Tickets channel email address
- e.g., Support Group
- Create a custom list in SPO
- e.g., Tickets
- Create request columns
- Email Body
- Email Attachments
- Status
- Create request columns
- e.g., Tickets
- Create a Flow in Power Automate
- e.g., Support Group Request Tickets
- Create SPO list item from Teams post.
- e.g., Support Group Request Tickets
Create a team in Microsoft Teams
Microsoft Teams is the hub for teamwork in Office 365. The tool itself is a chatter application for 1-to-1 chats and group conversations. However, these group conversations are ideal for channels and channels are built around a topic. Yet, for there to be channels, there must first be a team…
- Access Microsoft Teams from the Office 365 home page:
- Choose to Create team.
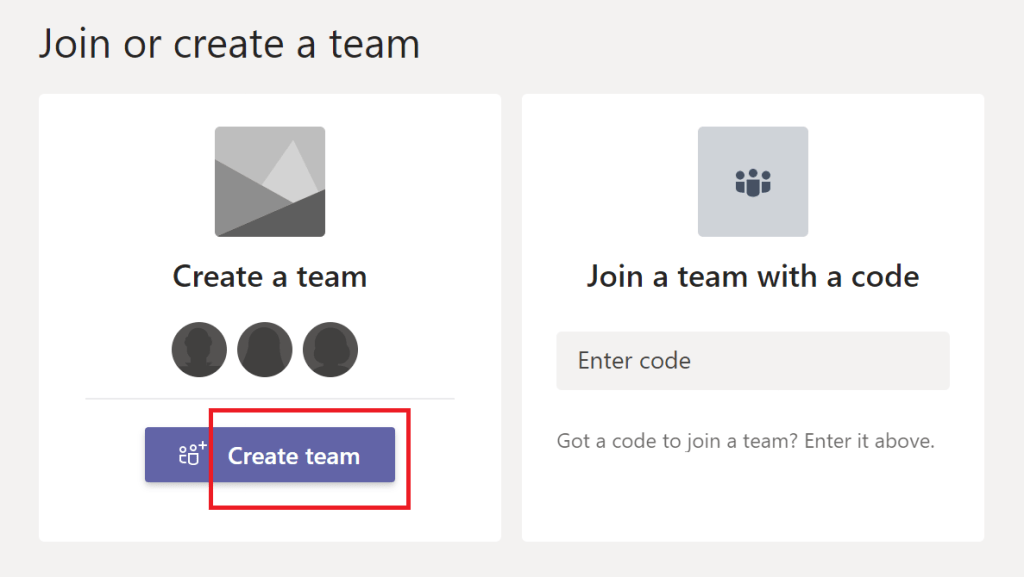
- This is a unique team, so choose to Build a team from scratch.

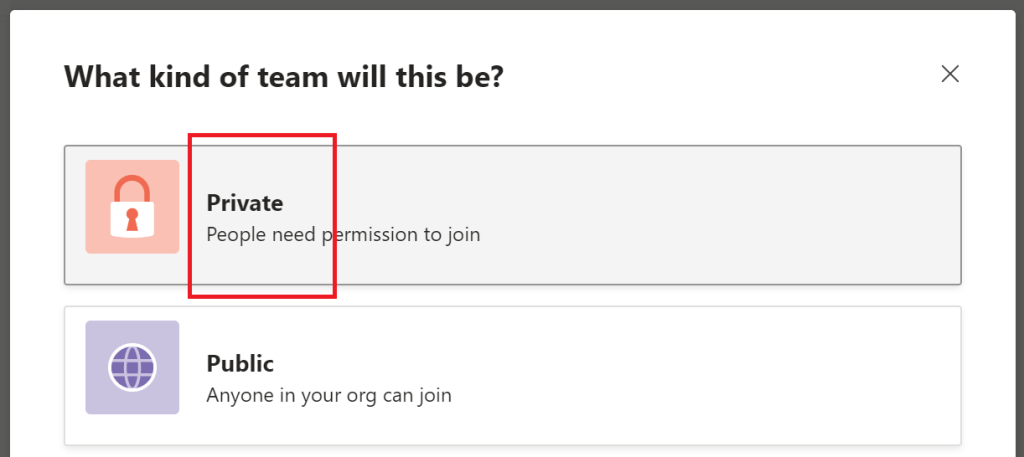
- The Support Group team should be private.
- Once the team is created, add a Tickets channel
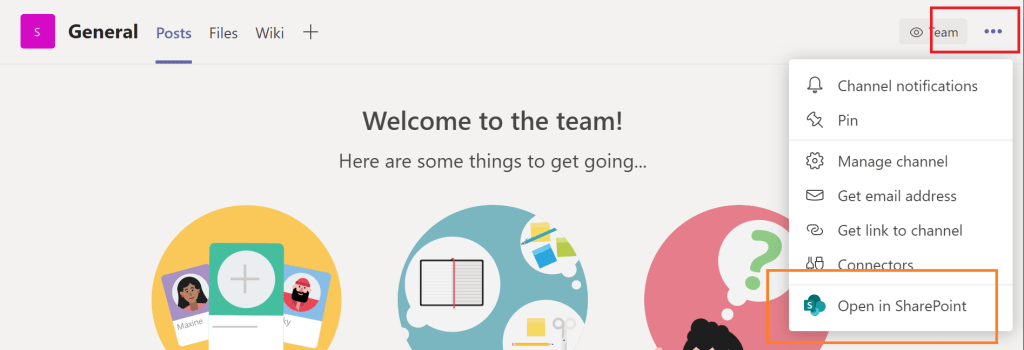
- Once the channel is created, get the email address.
- Now, open the back-end SPO site from the General channel.
Step 1 / 3 complete!
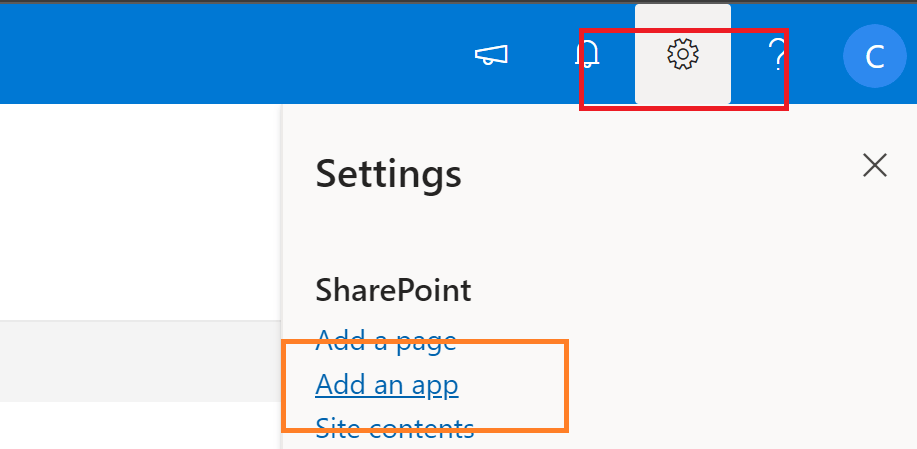
Create a custom list in SPO
The [SharePoint Online] back-end of the Support Group team is now presented. For the uninitiated, SPO is a cloud-based service that helps organizations share and manage content. Nevertheless, to build this ticketing system, a custom list will be needed, so Add an app…
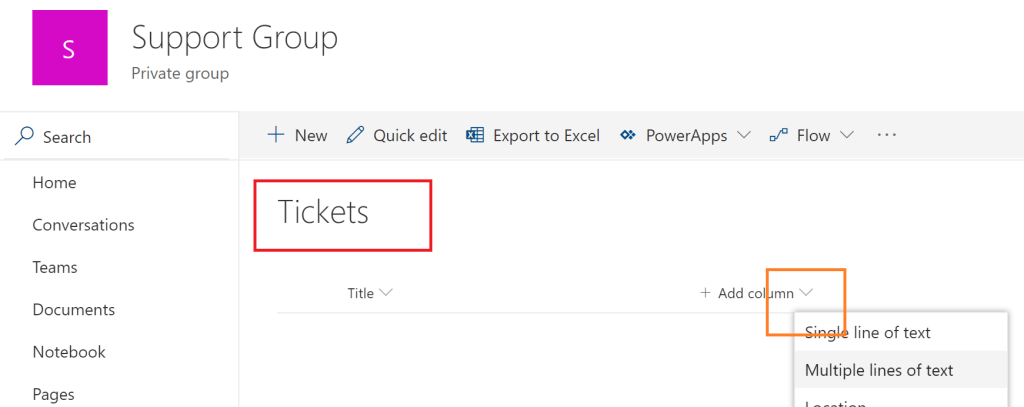
- Choose the Custom list app and give it a name.
- e.g., Tickets
- Create columns:
- Email Body
- Email Attachments
- Status
- Create columns:
- e.g., Tickets
Note: The Title column is a default field.
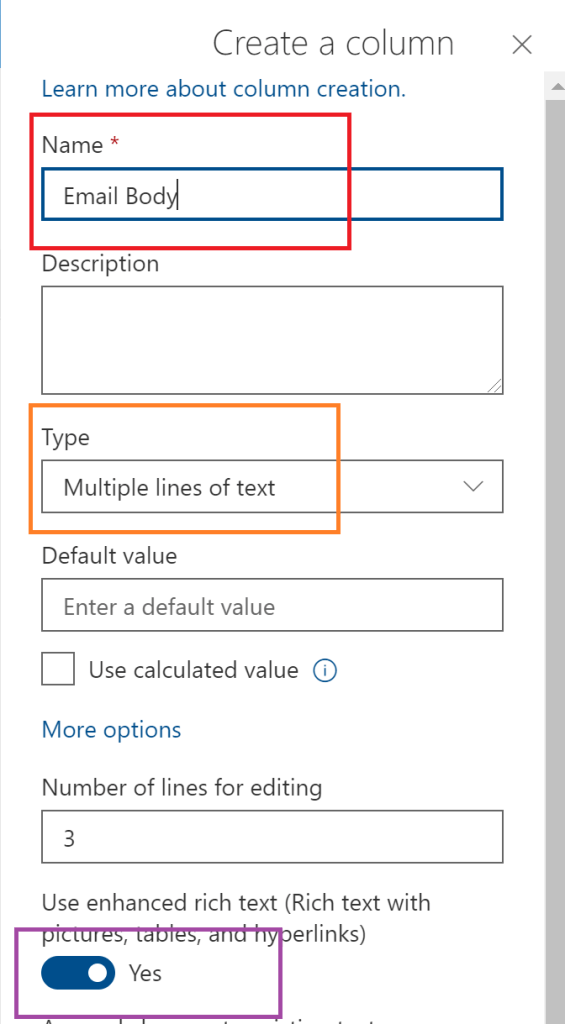
Email Body:
- Select multiple lines.
- Select to use rich text.
Email Attachments:
- Select multiple lines.
- Select to use rich text.
Note: The Status column is a choice field.
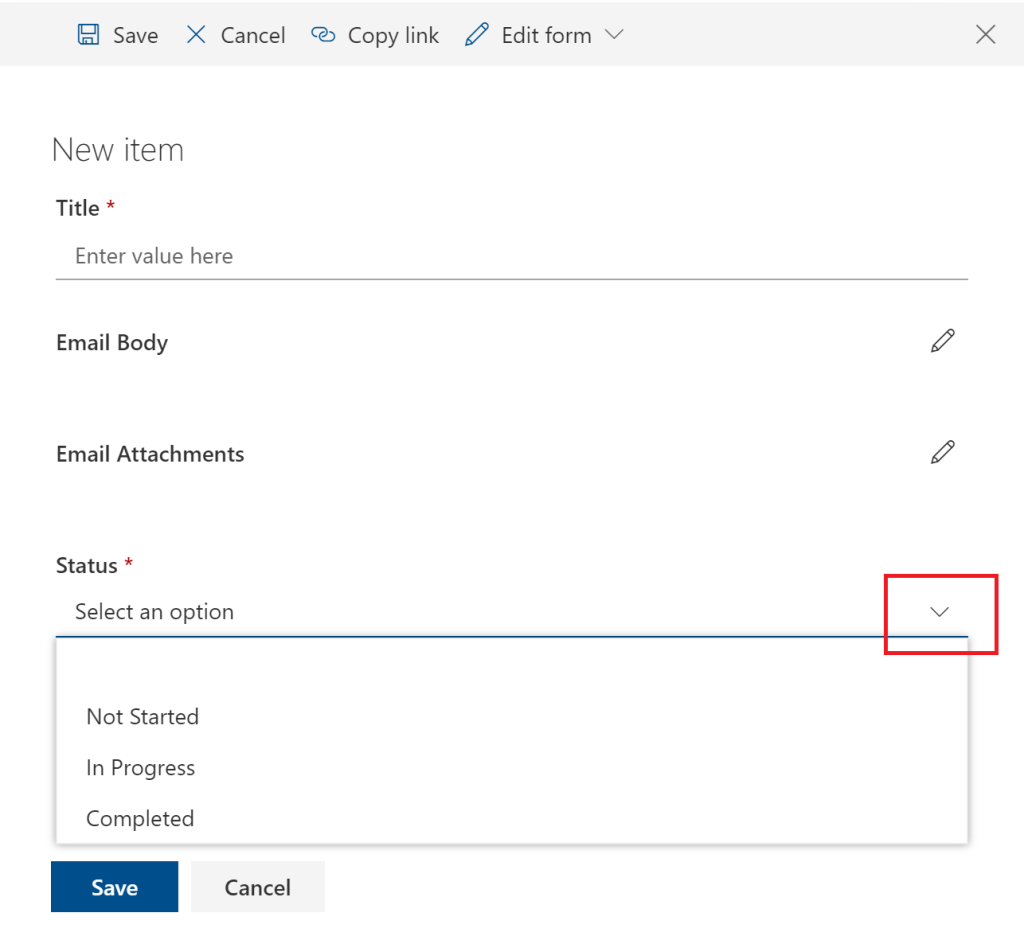
Status:
- Not Started
- In Progress
- On Hold
- Completed
Step 2 / 3 complete!
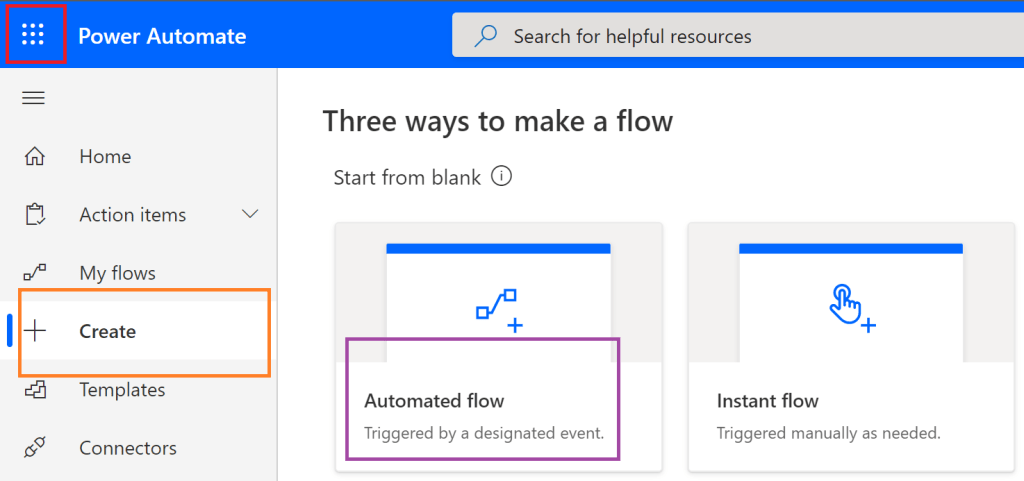
Create a Flow in Power Automate
Using the app launcher/ waffle in the top-left corner, navigate to Power Automate and away from the SPO site. Formally known as Flow, Power Automate is a tool for robotic process automation. Basically, workflows…
- Once at the Power Automate main page, Create an Automated flow.
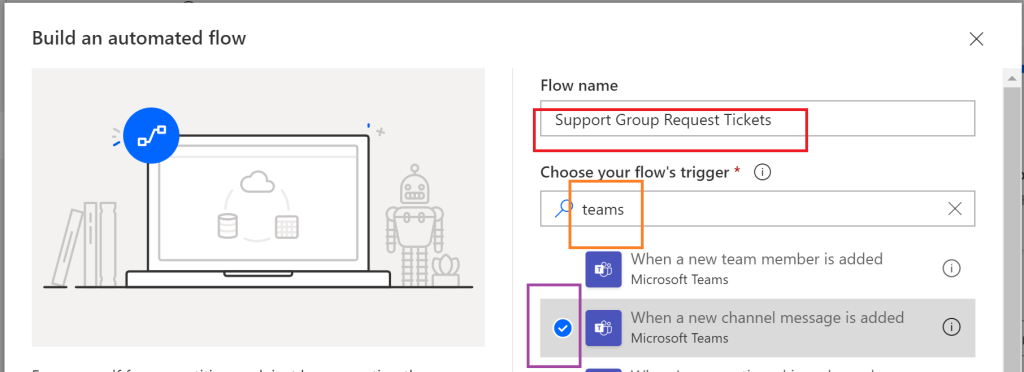
- Give the Flow a name.
- e.g., “Support Group Request Tickets“
- Filter for teams to trigger the Flow.
- When a new channel message is added
- e.g., “Support Group Request Tickets“
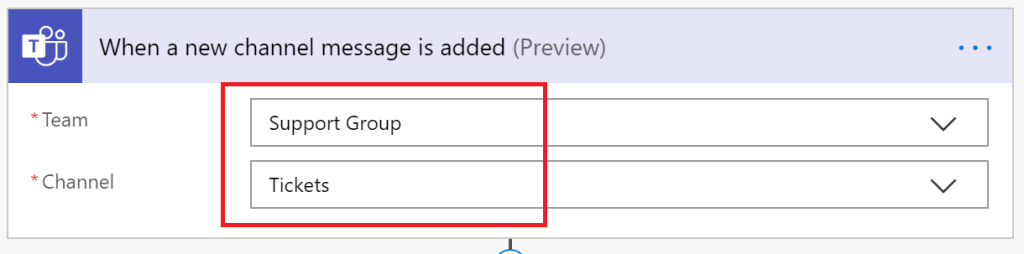
- Configure the Flow’s trigger:
- Select the Support Group as the Team.
- Select the Tickets channel
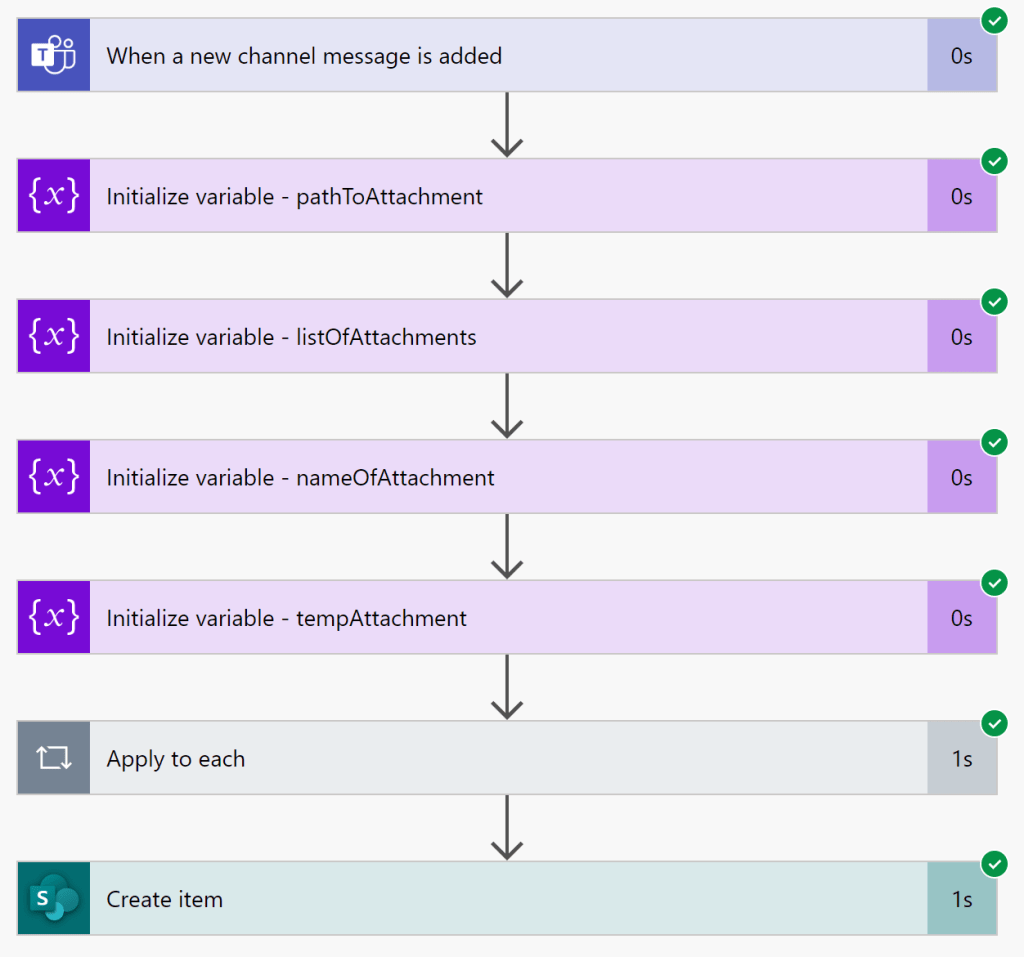
- Within the workflow, initialize four new variables after the trigger:
- pathToAttachments
- listOfAttachments
- nameOfAttachment
- tempAttachment
The variable tempAttachment should be an Object, but the other three will be Strings. Though the pathToAttachments variable should have a default value of:
https://{tenant-id}.sharepoint.com/sites/SupportGroup/Shared Documents/Tickets/Email Messages/
Understanding the URL, the {tenant-id} is a placeholder and should be replaced with the actual Office 365 tenant name. SupportGroup is the relative path to the back-end SPO site and Shared Documents is the default document library storing the site files. The Tickets path is a folder representing the Microsoft Team’s channel, and Email Messages stores the original email and attachments. Despite that, the Email Messages folder isn’t generated until an attachment is received.
Moving on, the Flow has a trigger and four variables have been initialized. Next up is processing the Message attachments. Add an action to loop through each attachment:
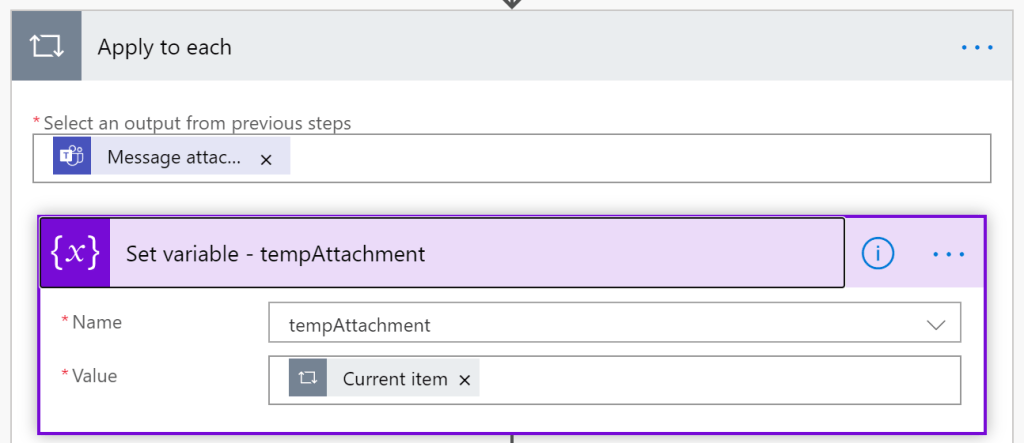
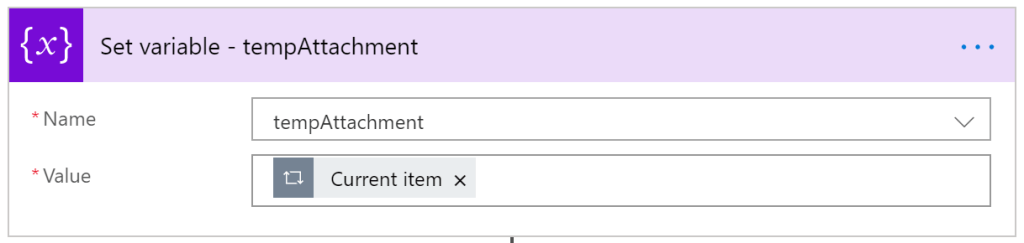
While still within the Apply to each block, set these variables:
- Set the Current item to the tempAttachment variable.
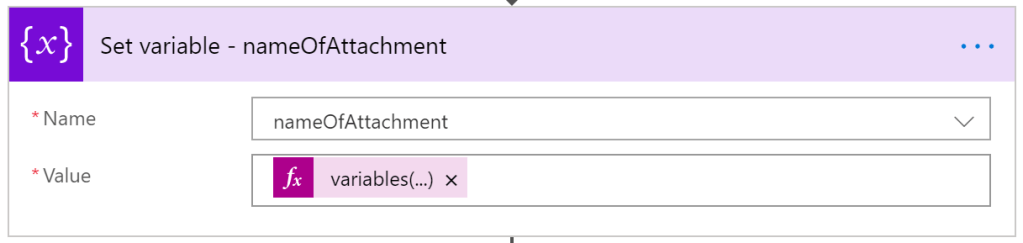
- Set the nameOfAttachment variable to the current attachment name.
- Expressions > Referencing functions > variables(variableName)
variables('tempAttachment')['name']
- Append the concatenated attachment link to the listOfAttachments variable.
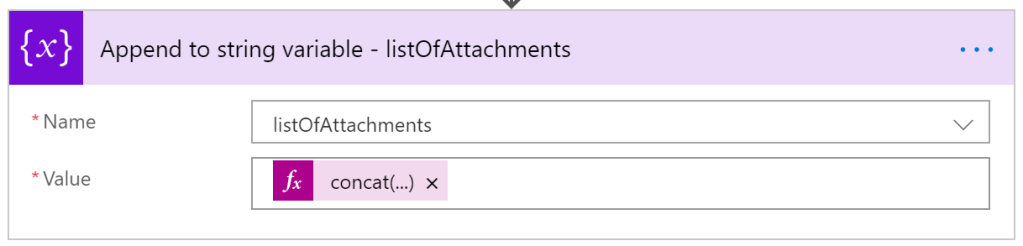
concat(
     '<a href="',
          variables('pathToAttachmentsFolder'),
          variables('nameOfAttachment'),
     '">',
          variables('nameOfAttachment'),
     '</a><br/>'
)
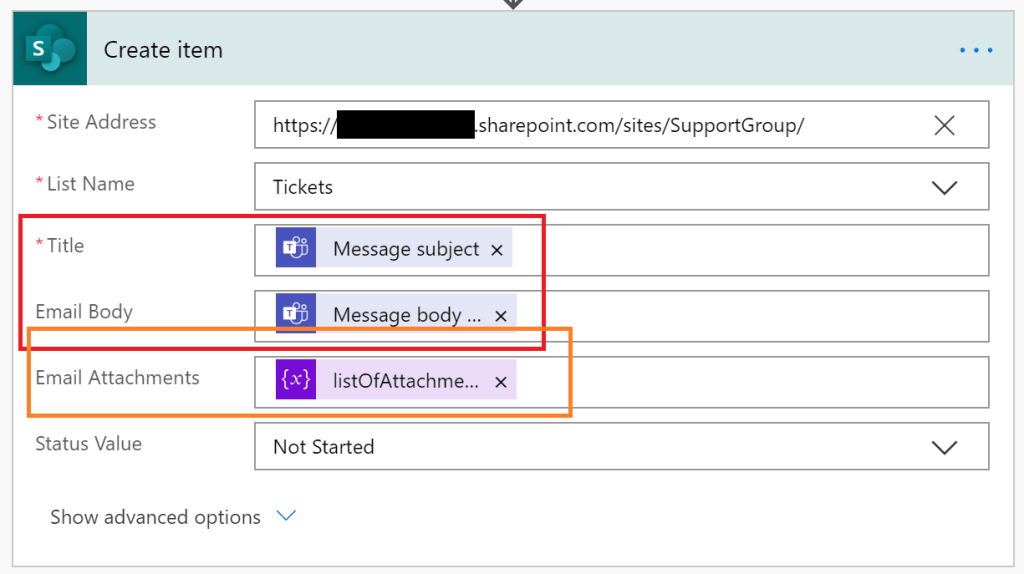
Exiting the loop, all of the variables have been set. The last piece of this puzzle is creating an item in SPO. Provide the site URL in the Site Address field, then select the Tickets list.
Now to assign list item values! Message subject from the post in Teams is set to the Title field and Email Body will be assigned the Message body. But Email Attachments will be the listOfAttachments variable. Lastly, the default Status is set to Not Started:
Step 3 / 3 complete!
Send email to Teams channel
Done! The team was created in Microsoft Teams and this created the back-end SPO site. Within the Support Group team, the Tickets channel was created and its email address is copied for testing…
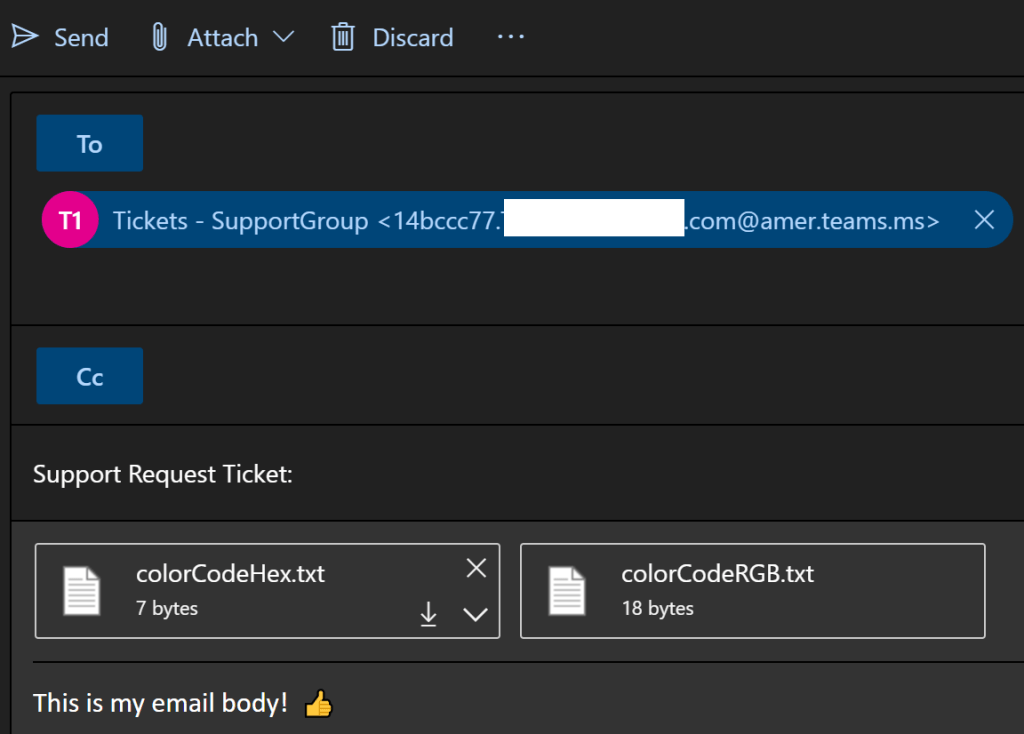
Send an email to the email address. Be sure to include a subject, a body, and add a few attachments to properly test.
Note: It may take a few minutes for the workflow to trigger.
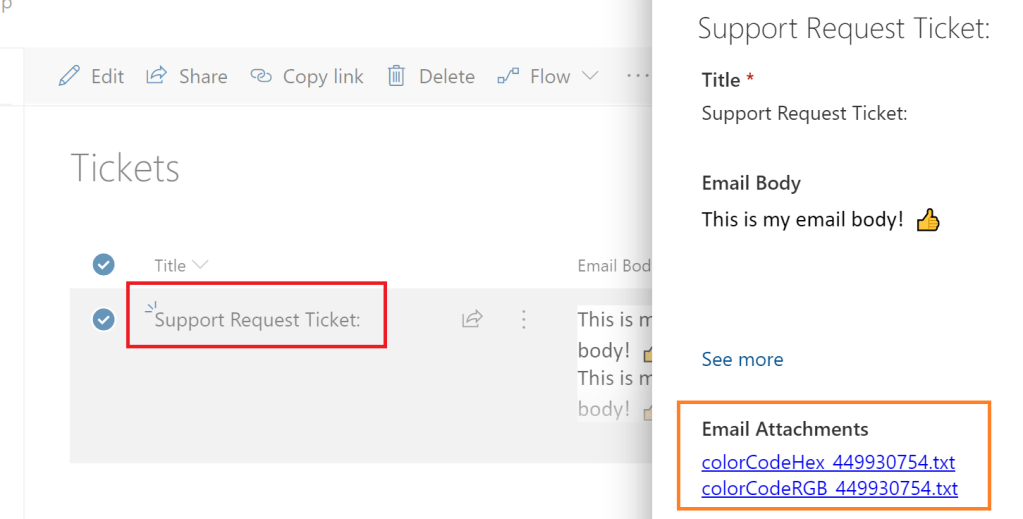
Success!
The workflow was triggered and all steps executed properly.
Navigating back to the SPO site and opening the Tickets list, the sample list item is created:
Conclusion:
This post is detailed because there are more steps involved to build a more robust ticketing system. Still doesn’t take more than half an hour to build and test though.
Because the Email Attachments field supports rich text, the links are HTML. The links are clickable and point to the attachments. This was an easier solution than having to move the attachments elsewhere…
“The most important thing is to try and inspire people so that they can be great in whatever they want to do.”
Kobe Bryant

Love you guys, this is the perfect solution, didn’t find it anywhere else!
LikeLike
Happy to hear that this was helpful.
LikeLike
I am at a loss for the step:
“Within the workflow, initialize four new variables after the trigger:
pathToAttachments
listOfAttachments
nameOfAttachment
tempAttachment”
Perhaps the layout has changed since this was posted but I do not see how to proceed with these actions.
This is also my first time using Power Automation.
LikeLike
Isaac, Power Automate flows are triggered by actions. In this example, the action is a post being added to a Teams channel. In the success image at the end, you’ll see that I added 4 steps that “Initialize variable”. When you “Add an action”, you’ll need to search for “Variable”…
LikeLike
I should specify.
I am currently stuck at what you capture in this image https://charleslakes.files.wordpress.com/2020/03/2020_03_16-18.png?w=1024
the only difference is I am unable to input anything into the “Name” field.
When I select the Name field an empty drop down menu appears.
How do I add “tempAttachment” and subsequently the others names, to that field?
LikeLike
Isaac, Power Automate requires that you first create the variable(s). Before your “Set variable” action can be used, you have to add an action to “Initialize variable”. Afterwards, that empty drop down menu will have a list of your initialized variables…
https://docs.microsoft.com/en-us/power-automate/create-variable-store-values
LikeLike
Nice post. I had to fix the concat line from:
variables(‘pathToAttachmentsFolder’)
to the actual variable that was initialized:
variables(‘pathToAttachment’)
Once fixed, it saved and worked as expected. Thanks for the great idea.
LikeLiked by 1 person
This article was exactly what I was looking for!
However, I seem to have a problem with the URL to the folder. I get the message: Flow save failed with code ‘InvalidVariableOperation’ and message ‘The inputs of workflow run action ‘Append_to_string_variable’ of type ‘AppendToStringVariable’ are not valid. The variable ‘pathToAttachmentsFolder’ must be initialized before it can be used inside action ‘Append_to_string_variable’.’.
I copied the link from the folder but appearantly it is not right. Can you please help me where the mistake is? Thanks a lot! 🙂
https://hempelgroup.sharepoint.com/:f:/r/sites/GeneralConditionsupdateinERPdocuments/Shared%20Documents/Tickets?csf=1&web=1&e=QkgKBF
LikeLike
Hi, Annasofie. I have two suggestions…
(1) Initialize the variables outside of the “Apply to each” loop first. My steps are summarized, so it isn’t shown, but I have several “Initialize variable” blocks at the top of my flow.
(2) The URL to your folder should be an absolute path. The URL you provided should be more like this:
https://hempelgroup.sharepoint.com/sites/GeneralConditionsupdateinERPdocuments/Shared%20Documents/Tickets
LikeLike
It worked! Thanks a lot 🙂
LikeLike
I tried to follow same methodology but based on the trigger: “when an email arrives in a shared mailbox v2”. I was hoping that could get Teams to post the mail in the channel with all attachments and save them to SharePoint as in your example. Do you know if that could be possible in any way? Thanks in advance! 🙂
LikeLike
I’m sure it is possible, but in this example, my files are emailed to the Teams, so they’re already loaded into SharePoint. If you’re using “When an email arrives in a shared mailbox v2” trigger, then your automation will need to loop through the email attachments and recreate each file in SharePoint…
LikeLike